
Want to use wine-staging, but need a more recent version than what the official repositories provide? Building and compiling wine-staging 2.22 isn’t as hard as it looks.
I needed to build and compile wine-staging 2.22, but it wasn’t easy to piece together how to do it from various forums and documentation. Hopefully this tutorial saves someone a headache!
Background: I recently had the urge to go back and play Skyrim again for the first time since ditching Windows for Ubuntu. Naturally, I also wanted to play with mods, and take full advantage of hardware acceleration for high-quality graphics and performance.
To do all that in my standard Ubuntu environment, I needed to use wine, or more specifically, wine-staging. While the stable branch of Wine in the Ubuntu 16.04 repositories does a decent job of running Skyrim, Wine Staging adds support for a bunch of performance enhancements (like CSMT and CUDA support) that really make a difference, especially if you’re loading up your game with mods and additional textures.
At the time of writing, the latest official wine-staging release uses Wine 2.19, but that’s a problem for Skyrim: Wine’s support for Skyrim Script Extender (SKSE) broke between versions 1.9 and 2.22, and most Skyrim mods have SKSE as a dependency. You could use the standard wine package instead (which uses Wine 3.0), but you lose support for CSMT and CUDA. What to do?
Build wine-staging 2.22 yourself!
If you’ve never built and compiled Linux programs before, it can seem daunting- but thanks to some fine work by Cybermax on the WineHQ forums, it’s easier to build a wine-staging based on Wine 2.22 than you’d think. Here’s how I did it on Ubuntu 16.04 64-bit:
Remove all existing wine and/or wine-staging packages and set up dependencies
If you previously had other Wine versions installed, you need to remove them so they don’t interfere with the build. You may also need to remove your existing wine directory (ie, ~/.wine) unless you know what you’re doing.
You can find what packages you have installed by using apt-cache:
apt-cache madison wine
 wine | 1:1.7.55-0ubuntu1 | http://ppa.launchpad.net/ubuntu-wine/ppa/ubuntu/ trusty/main amd64 Packages
 wine | 1:1.6.2-0ubuntu4 | http://mirrors.xmission.com/ubuntu/ trusty/universe amd64 Packages
 wine1.6 | 1:1.6.2-0ubuntu4 | http://mirrors.xmission.com/ubuntu/ trusty/universe Sources
 wine1.7 | 1:1.7.55-0ubuntu1 | http://ppa.launchpad.net/ubuntu-wine/ppa/ubuntu/ trusty/main Sourcessudo apt list --installed | grep -i wine
Remove them all one by one (including winetricks). Don’t worry, we’ll reinstall them later for our new version. Replace <packagename> with the names of the packages from apt list:
sudo apt-get purge --auto-remove <packagename>
Next, we need to install all the dependencies necessary to build Wine.
Enable 32-bit architecture (if your system is 64 bit):
sudo dpkg --add-architecture i386
Add the WineHQ repositories (if you haven’t already):
wget -nc https://dl.winehq.org/wine-builds/Release.key
sudo apt-key add Release.key
sudo apt-add-repository https://dl.winehq.org/wine-builds/ubuntu/
sudo apt-get update
You also need to enable source code for both the WineHQ repository AND for Ubuntu core. Open up Software & Updates and make sure those are checked on the “Ubuntu Software” tab and the “Other Software” tab:
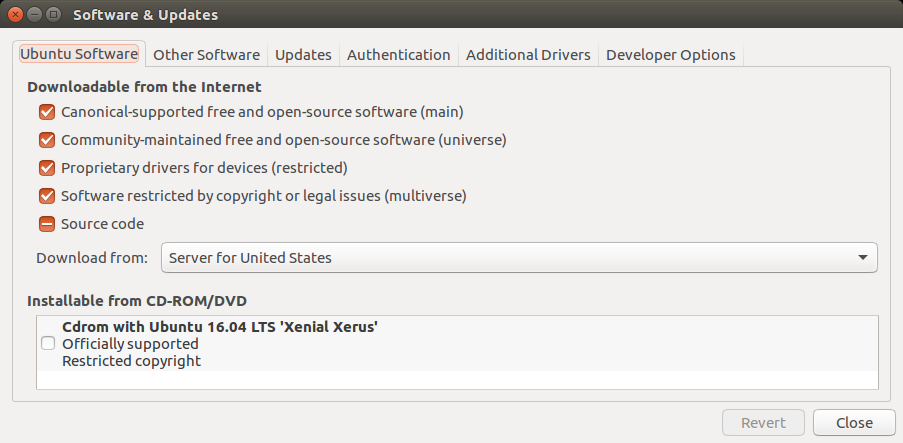
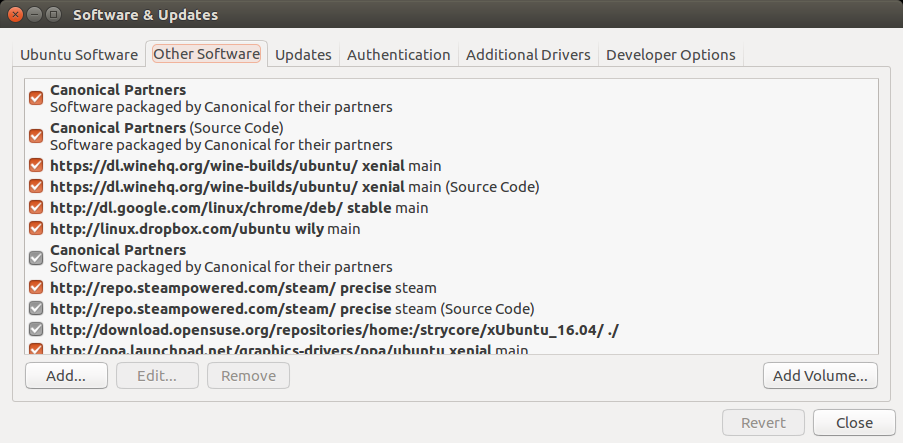
If you configured all that correctly, you’ll be able to install the Wine build dependencies:
sudo apt-get build-dep wine
Because nothing good in life is easy, build-dep wine doesn’t actually include all the dependencies you need to build wine-staging; we need to install a few additional packages as well:
sudo apt-get install libva-dev libpcap-dev libgtk-3-dev libgstreamer-plugins-base1.0-dev libudev-dev libkrb5-dev
Finally, install git if you don’t already have it installed:
sudo apt-get install git
Now you’re ready to build!
Downloading source and applying patches
Building essentially consists of grabbing the Wine 2.22 sources, applying patches to them, and then making an install.
Start by creating a directory somewhere in your home directory to work in (I used ~/winebuild) and navigate inside:
mkdir ~/winebuild
cd ~/winebuild
Next, download and extract the Wine 2.22 sources:
wget https://dl.winehq.org/wine/source/2.x/wine-2.22.tar.xz
tar xvJf wine-2.22.tar.xz
Now we need to apply the patches that convert from wine to wine-staging. Generating these yourself is beyond the scope of this tutorial, but thankfully Cybermax at the WineHQ forums has already created these and made them available via Github:
git clone https://github.com/SveSop/wine-staging.git wine-staging-2.22_partial
cp -avf wine-staging-2.22_partial/*  wine-2.22/
Finally, navigate into the wine-2.22 folder and apply the patches:
cd wine-2.22
./patches/patchinstall.sh DESTDIR="$(pwd)" --all
autoreconf -f
Building and Compiling wine-staging 2.22
Now that we’ve downloaded the Wine 2.22 source and patched it to wine-staging, we’re ready to actually build and install the package. On Ubuntu, this is where things get tricky, because Ubuntu doesn’t have great support for building 32-bit programs on 64-bit systems. Since 32-bit Wine is generally better supported than 64-bit, you’ll usually want both architectures (“multiarch” or “biarch”) so we’ll need to take a few extra steps to do it.
First, the easy part- making a 64-bit build. Create a folder, navigate into it, and compile (this will take a while):
 mkdir ~/winebuild/wine_2.22_64
 cd ~/winebuild/wine_2.22_64
 make clean
 ~/winebuild/wine-2.22/configure --enable-win64 --without-hal
 make -j4
Some notes:
- The make clean command clears out any previous make configuration you may have done.
- The –enable-win64 argument tells the compiler to create a 64-bit version
- The –without-hal argument tells the compiler to skip an obsolete optional dependency for legacy device support. I couldn’t find the necessary library to make this work in Ubuntu 16.04, so I skipped it.
- If you see any errors in this step about missing dependencies, delete this folder, go back and make sure you have all dependencies installed, and try again.
Now comes the hard part- making a 32-bit build. To do this, we’re going to need to emulate 32-bit Ubuntu. There are a few ways to do this, but I used a program called lxc, which is like a basic virtual machine. This lets us temporarily simulate a 32-bit environment so we can compile everything properly.
Install lxc, and create a 32-bit container. The code example assumes your home directory is the same as your login name (if its not, swap $LOGNAME for your home dir):
sudo apt-get install lxc
sudo lxc-create -t ubuntu -n my32bitbox -- --bindhome $LOGNAME -a i386
Note: this failed for me the first time I tried it when a package failed to download, but it worked after running the lxc-create command a second time. /shrug
You’re going to need to install all the same dependencies in this LXC container, so rather than adding all the repositories again manually, just copy your apt configuration from your host environment:
sudo cp -R /etc/apt /var/lib/lxc/my32bitbox/rootfs/etc
Then go ahead and start up your new 32-bit container (might take a minute):
sudo lxc-start -n my32bitbox
Next you’re going to attach to this container. LXC can be tricky to switch between normal and elevated permissions though (ie, using sudo or su) so pay very close attention to the commands and your command prompt.
In a new terminal window, attach to your LXC container as root:
sudo lxc-attach -n my32bitbox
Make sure your prompt looks like this:
root@my32bitbox:~$
Update apt and install all the same dependencies you installed earlier (remember you’re logged in as root and don’t need sudo):
apt-get update
apt-get install python-software-properties git-core
apt-get build-dep wine
apt-get install libva-dev libpcap-dev libgtk-3-dev libgstreamer-plugins-base1.0-dev libudev-dev libkrb5-dev
Switch to your regular username (mine is “nick”):
su nick
Your prompt should now look like this:
nick@my32bitbox:~$
Now you’re going to start by building 32-bit Wine tools. This is basically the same as what you did to make the 64-bit version- it won’t work properly on its own, but we’ll need it for the next step. Make a new directory in your build folder, navigate inside, and configure and compile (this will take a while):
mkdir ~/winebuild/wine_2.22_32_tools
cd ~/winebuild/wine_2.22_32_tools
make clean
~/winebuild/wine-2.22/configure --without-hal
make -j4
Again, if you see any errors about missing dependencies, delete this folder, go back and make sure you have all the dependencies installed, and repeat.
Now you can build the real 32-bit version, using the tools your just created and 64-bit version you created earlier. To do that, we’re going to use the arguments –with-wine64 (pointing to your 64-bit build) and –with-wine-tools (pointing to your 32-bit tools build). These arguments don’t like shorthand for your home path (eg “~/”) so make sure you use “$HOME” instead:
mkdir ~/winebuild/wine_2.22_32
cd ~/winebuild/wine_2.22_32
make clean
~/winebuild/wine-2.22/configure --with-wine64=$HOME/winebuild/wine_2.22_64 --with-wine-tools=$HOME/winebuild/wine_2.22_32_tools --without-hal
make -j4
Now to force the last little bit of building, install the 32-bit Wine in the LXC itself. We need root privileges for this, so exit from your username (your prompt should switch back to root):
exit
Then make and install:
cd ~/winebuild/wine_2.22_32
make install
Whew! You’re done building finally. Shut down the LXC container and return to your host architecture:
sudo shutdown -h now
Make sure you’re now back in your real machine, with your normal command prompt looking something like this (with your hostname instead of “localhost”):
nick@localhost:~$
Now that you have both a 64-bit and 32-bit version of wine-staging 2.22, go ahead and install them (finally!):
cd ~/winebuild/wine_2.22_32
sudo make install
cd ~/winebuild/wine_2.22_64
sudo make install
This will take a while. Once you’re done, check your Wine version. If you did everything correctly, you should see “wine-2.22 (Staging)” as output:
wine --version
  wine-2.22 (Staging)
You’ll probably want to reinstall winetricks for additional configuration:
sudo apt install winetricks
That’s it! You can now use both 64-bit and 32-bit wine-staging like normal, except you’ll be on the 2.22 version.
If you need to remove your manually installed version (ie, when the official wine-staging gets updated to 2.22 or later), navigate back into your 32-bit and 64-bit build folders and make uninstall:
cd ~/winebuild/wine_2.22_32
sudo make uninstall
cd ~/winebuild/wine_2.22_64
sudo make uninstall
Hopefully this helps someone- for more information on building and compiling wine-staging, read the official documentation from WineHQ as well:
https://github.com/wine-compholio/wine-staging/wiki/Packaging
https://wiki.winehq.org/Building_Biarch_Wine_On_Ubuntu
And special thanks to Cybermax and rboxeur at the WineHQ forums for the patch script and tutorial on using it.
Questions or feedback? Leave me a comment!