
Controlling Pi-Hole with Physical Buttons
I recently set up Pi-Hole, the awesome network-wide ad blocker that runs on a Raspberry Pi. But, I wanted an easy way to enable/disable it using physical buttons attached to the device itself. No problem- thanks to a Pimoroni Button Shim and some Python scripting, I can now control my Pi-Hole with the press of a button!
Read on for full instructions and the script I used.
Background
I love my Pi-Hole, but every once in a while it gets a little too enthusiastic with its ad blocking. If you’re like me and live with other people, inevitably you’re going to have the odd website or link where blocking is problematic. If you had the skill to set up a Pi-Hole in the first place it’s not too difficult to whitelist these and move on with your day, but what if you’re not available? The last thing you want is to come home to an angry family member or significant other who couldn’t access their favorite deal site during that once-in-a-lifetime flash sale…
Sure, Pi-Hole comes with a slick web UI that lets you disable ad blocking, but sometimes your fellow household members aren’t that tech-savvy (plus it’s easy to mess up important settings if you’re not careful). That’s why I wanted anyone in my house to be able to easily temporarily disable Pi-Hole with the push of a button. So I added someone buttons and wrote up a script to empower them to do just that!
Materials Needed
To build this, I used:
- Raspberry Pi Zero W (Raspbian Stretch Lite)
- This is what I was hosting my Pi-Hole on, but you can use any Raspberry Pi model with 40 GPIO pins (Pi 1 Model B+ or later)
- Pimoroni Button Shim
- This is an awesome product- for just a few dollars you can very easily add 5 physical buttons AND a built-in RGB LED to your Pi
- 2×20-pin Strip Dual Male Header
- I used a dual male header for the GPIO pins on my Pi
- 2×20-pin Female Header (maybe)
- I used a 2×20-pin female header to mate the Button Shim with the male headers on my Pi since I wanted it to be removable and this also made it fit my case better, but this really depends on your setup
- Even better, this is included with the Button Shim for free!
- Vilros Premium Black Snap Together Case for Raspberry Pi Zero W
- This is just the case that came with my Pi Zero W kit, the official case or any case with a cutout to access the GPIO pins will probably work just as well (as long as you use the female header, since you need the buttons to stick out a bit)
- Soldering Iron
- Yes, we’re going to be doing some light soldering for this project- but it’s easy!
Setting up Pi-Hole
Obviously you need a Raspberry Pi with Pi-Hole installed and configured. I already had this set up, and I’ll assume you do too. If not, go ahead and follow the instructions on the Pi-Hole site.
Building the Hardware
To attach the Button Shim to the Pi, we need to install GPIO headers on the Pi, and attach the shim to them. This part does involve some soldering which can seem a little intimidating if you’ve never done it, but it’s actually quite easy.
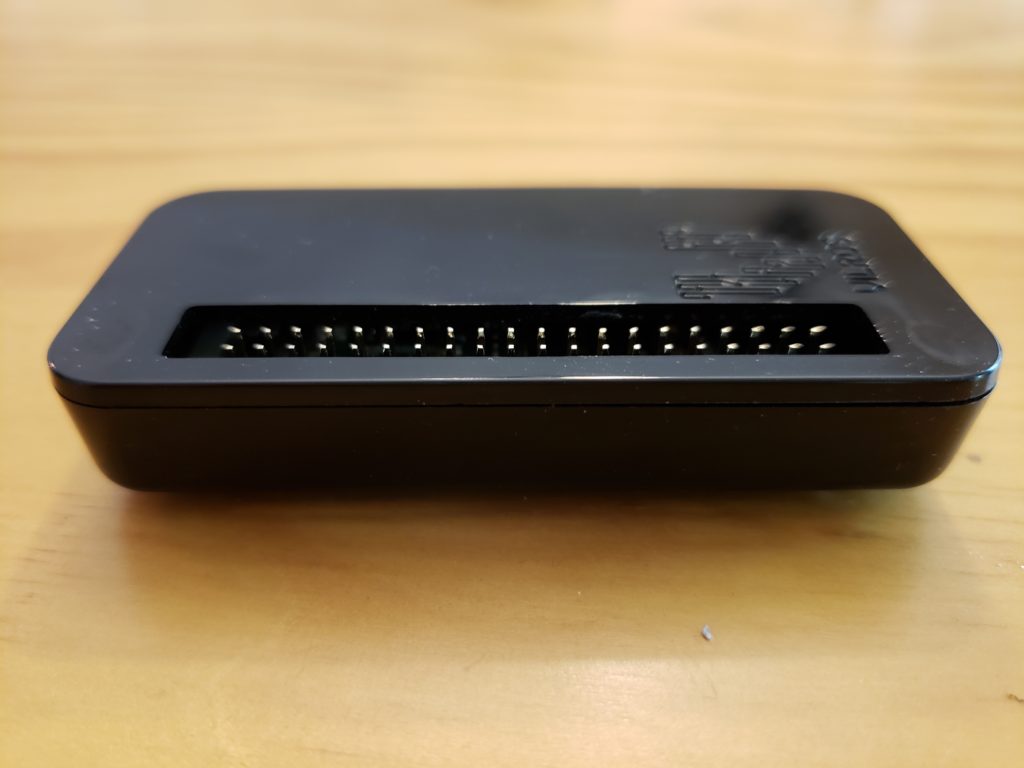
1) Solder Male Headers to Raspberry Pi GPIO Pins
Your 2×20-pin male headers probably have a short side and a long side. If you want your Button Shim to eventually go on top of your Pi, hold your Pi face up and insert the short side of the male headers through the top of your Pi so the shorter pins stick down beneath it, leaving the taller pins sticking up above (reverse this if you want the shim below your Pi). Flip the Pi over and secure the headers and Pi to a steady surface with some blue-tac or clamps, and carefully solder each of the 40 pins in place. You’ll want to make sure you take the SD card out first so you don’t accidentally damage it while soldering.
There’s a great video tutorial for this on the raspberrypi.org blog.
Should look like this when finished:

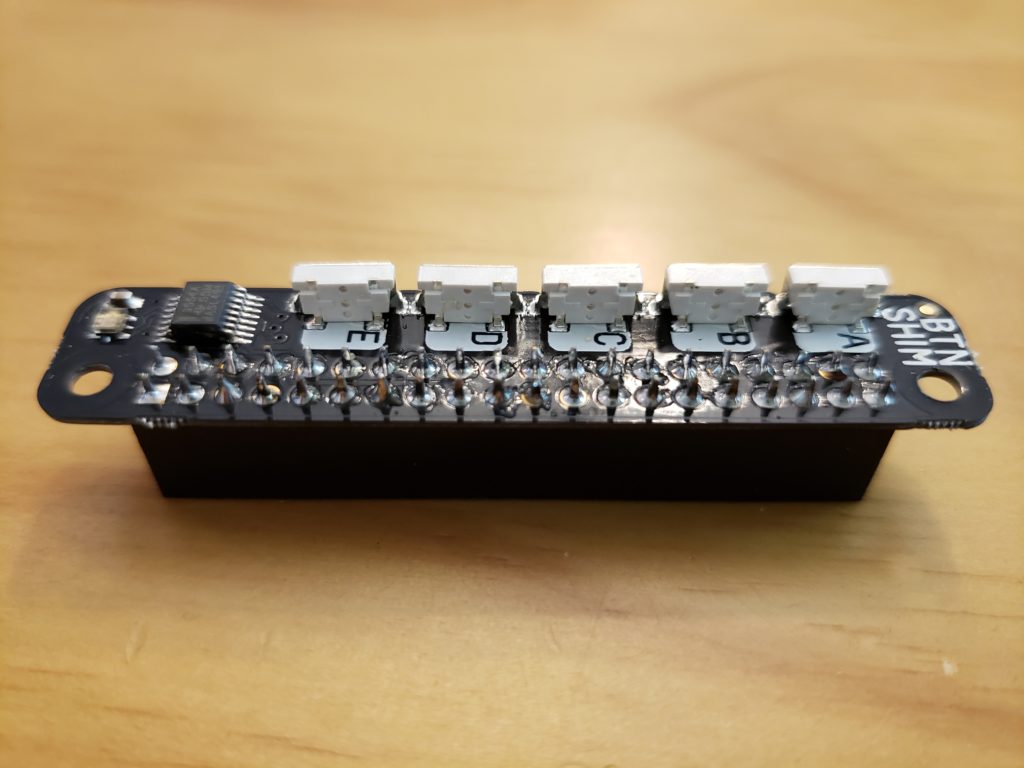
2) Solder Female Header to Pimoroni Button Shim
The Button Shim comes with an included 2×20-pin female header, which fits perfectly on to standard length 2×20 male headers we installed in the prior step. One end of this header has pins; the other is a black socket board. Holding the Button Shim so the LED and button labels face up, insert the pins from the header up through the GPIO holes from underneath, so the black socket board sits below. Secure it in place on a stable surface with some blue-tac or clamps. Now that you’re a pro at soldering, solder each of the 40 pins in place just like before.
Should look like this when finished:
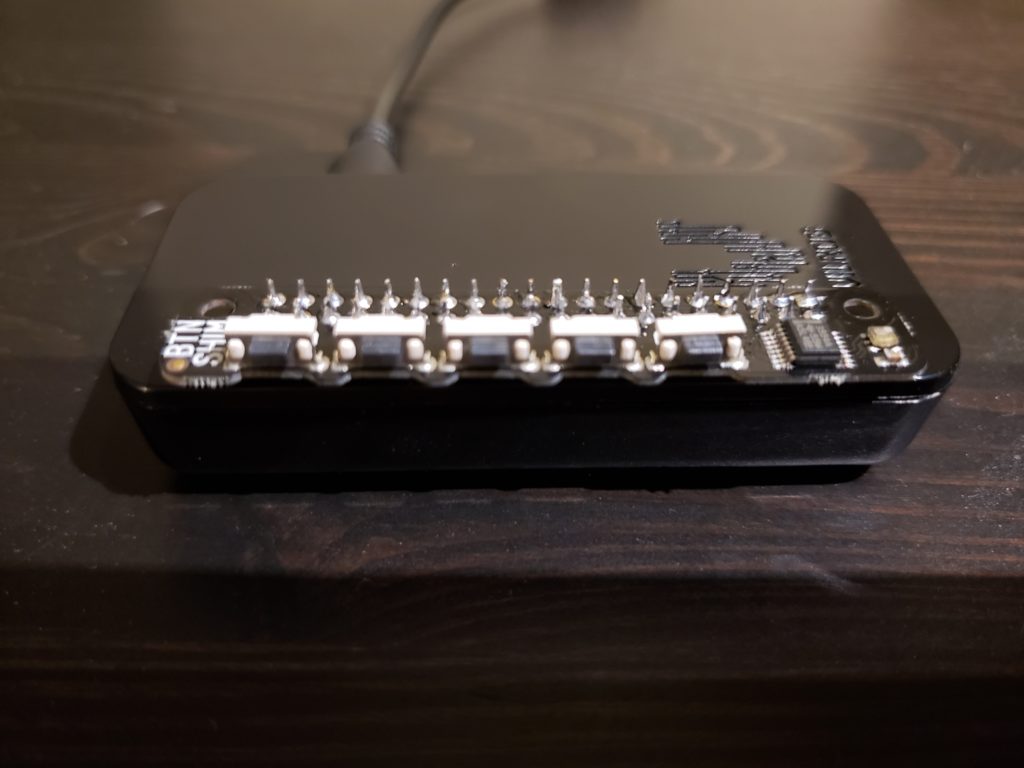
3) Plug It All Together
Once both the Pi and the Button Shim are soldered to their headers, plug the female header attached to the Button Shim into the male header attached to the Pi. If you’re using standard-length headers, this should plug completely in so no pins are exposed. You might have to give it a good push. If you have a case with an opening for GPIO headers to stick out on top, it might be easiest to set the Pi in the case first, put on the lid, and then attach the Button Shim, like this:
Setting up the Script
To actually control Pi-Hole from the physical buttons, we’ll write a Python script that uses the Button Shims’s buttons to call the pihole console command. At the same time, we’ll write some code to turn on (and blink!) the Button Shim’s LED as a status indicator.
1) Login to your Raspberry Pi
2) Install Pimoroni Button Shim Software
The Button Shim has some software to setup- you can get the latest instructions for this on the Pimoroni Github. This will install the Python libraries and all dependencies for using the Button Shim, which we’ll need.
3) Create Python Script
As a best practice, I like to put my custom scripts into the /home/[username]/bin directory. This isn’t created by default, so go ahead and create it now. The command looks like this:
cd ~
mkdir bin
Then, create a new Python script using Nano or your favorite text editor:
nano /home/pi/bin/piHoleButtons.py
Using the Button Shim library is pretty straightforward, so it’s pretty simple to write your own script to control the buttons here if you’re familiar with Python and/or Raspberry Pi GPIO scripting. Or you can just use my script (copy and paste the contents into the file you created):
#!/user/bin/env python

import signal
import buttonshim
import time
import subprocess

print("""
	Pi-Hole Button Control Running....

	Press Ctrl+C to Exit.
	""")

#Cycle and clear LEDs on startup (visual indication the script is running)
buttonshim.set_pixel(255,0,0)
time.sleep(0.3)
buttonshim.set_pixel(0,255,0)
time.sleep(0.3)
buttonshim.set_pixel(0,0,255)
time.sleep(0.3)
buttonshim.set_pixel(0,0,0)
pressId = 0

while True:
	def DisablePiholeTimer(numSecs):
		global pressId
		loopId = pressId
		for i in range(0,numSecs):
			if ( loopId != pressId):
				print "Ending loop with ID: " + str(loopId)
				return
			print "Pi-Hole disabled for " + str(numSecs-i)
			buttonshim.set_pixel(255,255,0)
			time.sleep(0.5)
			buttonshim.set_pixel(255,150,0)
			time.sleep(0.5)
		buttonshim.set_pixel(0,0,0)
		print "Pi-Hole reenabled"

	def SuspendPihole():
		global pressId
		loopId = pressId
		print "Pi-Hole suspended"
		while (loopId == pressId):
			buttonshim.set_pixel(255,0,0)
			time.sleep(0.5)
			buttonshim.set_pixel(0,0,0)
			time.sleep(0.5)

	def EnablePihole():
		global pressId
		loopId = pressId
		print "Pi-Hole enabled"
		for i in range(0,2):
			buttonshim.set_pixel(0,255,0)
			time.sleep(0.3)
			buttonshim.set_pixel(0,0,0)
			time.sleep(0.3)


	@buttonshim.on_press(buttonshim.BUTTON_A)
	def button_a(button, pressed):
		print "Disabling Pi-Hole for 300s"
		global pressId
		pressId += 1
		subprocess.call(['pihole','disable','300s'])
		DisablePiholeTimer(int(300))

	@buttonshim.on_press(buttonshim.BUTTON_B)
	def button_b(button, pressed):
		print "Disabling Pi-Hole for 1800s"
		global pressId
		pressId += 1
		subprocess.call(['pihole','disable','1800s'])
		DisablePiholeTimer(int(1800))

	@buttonshim.on_press(buttonshim.BUTTON_C)
	def button_c(button, pressed):
	        print "This button, it does nothing"

	@buttonshim.on_press(buttonshim.BUTTON_D)
	def button_d(button, pressed):
		print "Suspending Pi-Hole"
		global pressId
		pressId += 1
		subprocess.call(['pihole','disable'])
		SuspendPihole()

	@buttonshim.on_press(buttonshim.BUTTON_E)
	def button_e(button, pressed):
		print "Enabling Pi-Hole"
		global pressId
		pressId += 1
		subprocess.call(['pihole','enable'])
		EnablePihole()


	signal.pause()
4) Configure Script to Run on Boot
Now that we’ve got a script to control Pi-Hole using the Button Shim’s buttons, we need to configure it to run on boot. There are usually multiple ways to do this on a Raspberry Pi, but the way that worked best for me was to use systemd to create a daemon service. Here’s how to do it on Raspbian Jessie and later (most of the instructions here come from an excellent tutorial on raspberrypi-spy.co.uk):
Create a unit file:
sudo nano /lib/systemd/system/piHoleButtons.service
Add the following text (change the path in ExecStart to match where you saved your script):
[Unit]
Description=Pi-Hole Button Control
After=multi-user.target

[Service]
Type=idle
ExecStart=/usr/bin/python /home/pi/bin/piHoleButtons.py

[Install]
WantedBy=multi-user.target
Configure systemd:
sudo systemctl daemon-reload
sudo systemctl enable piHoleButtons.service
Once you reboot, after a few seconds your script should start running in the background.
sudo reboot
If you’re using my script, you should see the LED on the Button Shim briefly cycle from red to green to blue when the script starts, so if you see this once your Pi reboots, everything should be working correctly!
Using the Buttons
If you’re using my script, the buttons will be configured as follows. Feel free to tweak as needed.
- Button A
- Disables the Pi-Hole for 5 minutes. The LED will blink continuously from yellow to orange.
- Button B
- Disables the Pi-Hole for 30 minutes. The LED will blink continuously from yellow to orange.
- Button C
- Doesn’t do anything in my script, but you could use the same logic as the other buttons to add your own custom disable time or other function here.
- Button D
- Disables the Pi-Hole indefinitely. The LED will blink red continuously on and off.
- Button E
- Enables the Pi-Hole, if it’s disabled. The LED will blink green twice.
And that’s it! You can now disable your Pi-Hole either temporarily or indefinitely using physical buttons attached to your Pi.
Thanks for reading- leave me a comment if you found this helpful!
I think the real test will be when your least tech savvy family member (me) comes to visit and attempts to use this incredible device!!! Very impressive!
Hey,
when I run the keyboard.py example the following error happens:
Traceback (most recent call last):
File “keyboard.py”, line 32, in
@buttonshim.on_press([buttonshim.BUTTON_A, buttonshim.BUTTON_B, buttonshim.BUTTON_C, buttonshim.BUTTON_D, buttonshim.BUTTON_E])
File “/usr/lib/python2.7/dist-packages/buttonshim/init.py”, line 294, in on_press
setup()
File “/usr/lib/python2.7/dist-packages/buttonshim/init.py”, line 186, in setup
_bus = smbus.SMBus(1)
IOError: [Errno 2] No such file or directory
Does anybody have an idea what the failure is?
From the error it looks like you’re missing the Button Shim library.
Make sure you follow the instructions for installing the Pimoroni library from their github: https://github.com/pimoroni/button-shim
If you did that and it’s still not working, make sure you installed the right library for your Python version (eg if you’re using Python 2, use the Python 2 version)
Thanks for the good tutorial. However, I have one suggestion to improve it. For me, a very tricky problem was that I had not activated the I2C option in the raspi-config menu under the point “interfacing options”. I think it would be useful to add this to the tutorial.
Good callout- which model Pi and version of raspbian were you using? I don’t remember needing to do this with a Pi Zero W, I wonder if default options are different across models